Ambient Meditation 04072019

April 7, 2019

This is my first effort on my modular system to be published to YouTube and my first blog post providing some background on the piece.

This is a slightly different version – the former does not have the formant drone (Briads), while this one does:


Synopsis

Here is a synopsis of what’s in use and how its hooked up:

Marbles provides the master clock via trigger out “t2”.  Master clock goes to Noise Engineering Clep Diaz for pitch modulation of Mutant Clap, and to AMS Rotating Clock Divider, with div 5 and div 8 sent to Klavis Logic “and” to generate a trigger every 40 clocks.  That goes to a Doepfer ADSR, which then goes to an att/offset and then goes to the Clouds “pos” input which plays a motif captured from a Moog Subsequent 37 (5-7 DR Lead). The master clock also goes to Branches, which is set to occasionally trigger the formant voice on Braids. The Mutant Clap passes through a WMD DPLR (spread modulated by Marbles) and 2HP Verb. Additional ambience provided by Eventide Space (Earthhall) and Timefactor (ModDly).

Here are some photos and additional notes to help understand how the individual modules were set up.


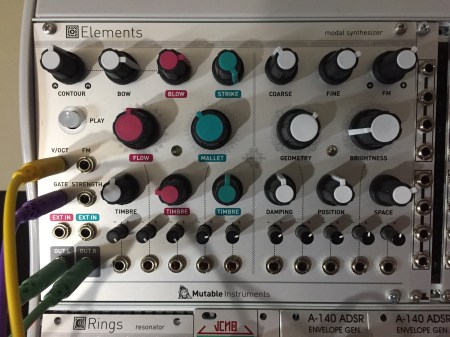
Elements; All three stimulators together with a medium envelope.


Mutant Clap: Some modulation on pitch…


Braids and Tip Top Z4000: Modulation on timbre to get a distinctive range of articulations.  Trigger from Branches goes to Tip Top Z4000 ADSR, which in turn goes to VCA.


Marbles: I turned it on and started patching. I set the rate to div4 to get this big open sound. I fiddled a bit without resort to manual, and liked what I heard!


img_1930


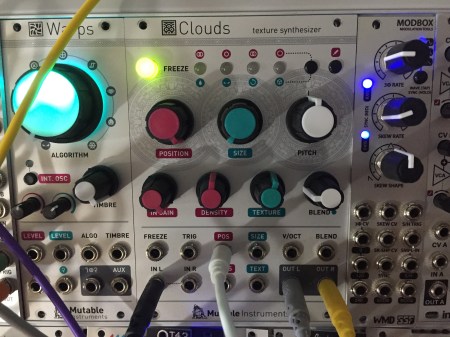
Clock processing: The clock is going to a passive mult where it’s split to the AMS RCD, the Cleo Diaz, and the Branches. The Klavis is ANDing the div5 and div8 to get a gate every 40 clocks – this triggers an ADSR, which in turn gets inverted and offset and then goes to Clouds “POS” input to play the motif.  The Branches output is set to occasionally trigger an ADSR which goes to a VCA gating the Braids.


img_1931


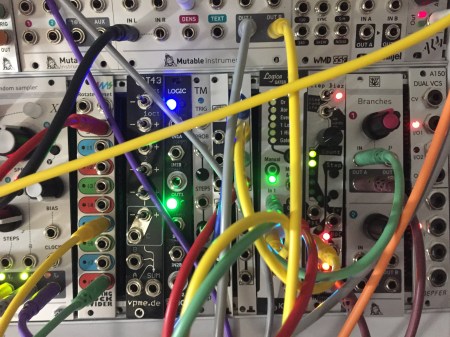
Doepfer A-140 ADSR: The ADSR provides a very slow CV to the Clouds.


The WMD DPLR and 2HP Verb provide delay and reverb for the clap. The delay spread is modulated.


Clouds is set to capture 16 seconds of input. The phrase doesn’t sound as long because it’s played back faster via the POS cv input.  The result was entirely serendipitous – what you hear is quite different (and more mysterious) than what I put in :).


Was this helpful? Drop me a note.

Glue Takes a Beating

April 12, 2015

My son has recently taken an interest in boffing – mock warfare using foam weapons called boffers.  We procured a coupe of boffer kits from Forged Foam which consisted of fiberglass rods, foam padding, and hilt rope.  While the supplied material are of very good quality, unfortunately they do not provide instructions for assembly.  I was able to find assembly descriptions at other sites, but one detail remained missing: what glue to use.

More than one web site suggested DAP glue, but it turns out that DAP makes many different types.  We tried DAP Weldwood contact cement, but it was clearly too weak.  We tried silicon rubber glue, but the foam started pulling away from the fiberglass core withing minutes of serious use.

Next, we tried some Gorilla Glue, which appears to do the trick – the bond is almost impossible to pull apart.  Here are some details on assembly.

Following the Gorilla Glue instructions, we damped one surface of the foam, and then applied the glue to the damp surfaces.  Because the foam wraps around the fiberglass core (see photos), we dampened and applied glue to the entire surface of half the foam, and then just the center  channel of the other half of the foam.

We then wrapped the foam around the fiberglass core.  We tried a couple different techniques to clamp the foam together.  For one boffer, we clamped the foam directly using a large number of clamps:

IMG_0934 IMG_0935

On the second boffer, we clamped the foam sandwiched between two pieces of plywood:

IMG_0933 IMG_0932

Both techniques worked equally well, but the second technique required fewer clamps.

Gorilla Glue expands as it dries, and leaks out of the seams:

IMG_0936

Once the glue was entirely dry (we waited about 18 hours), we trimmed off the expanded foam.  To do so we used a box (AKA utility) knife.  Here are the final results:

IMG_0939

A Virus on my Surface

April 7, 2015

I recently acquired an Access Virus T1 Desktop.  I’m running Propellerhead Reason and Ableton Live on my Microsoft Surface Pro 3 (with good results once I got a Bluetooth mouse) and went immediately to work to connect my Virus to my Surface.  I have a Korg MicroKey 37 which connects via USB and has a internal USB hub with a single USB in – I planned to connect the microKey 37 to the single USB port on the Surface, and connect the Virus to the pass-through USB port on the microKey 37.  Little did I know that the Virus would not connect behind a hub – two or three USB hubs later, I finally figured it out.

To solve my problem, I acquired a Microsoft Surface 3 Pro dock.  This was expensive, but it provides multiple USB connections as well as a graphics port and powers the Surface, and is mechanically very solid.  Most importantly, it connects through the Surface’s power port, leaving the USB 3 port on the upper right of the Surface free for use.  The microKey 37 goes into to a USB port on the dock station, and the Virus goes into the USB port on the side of the Surface 3.

Note that the Virus will not work if connected to USB on the dock – this is likely because the dock is acting as a USB hub, and not as a USB primary controller.  And so , the only USB port that the Virus can connect to is the USB 3 connector on the upper right edge of the Surface.  If you were hoping to connect more than one Virus to the Surface Pro 3, I don’t think that’s going to work.

Sound Advice – Installing Primacoustic Broadway Panels

September 12, 2012

The space I use for mixing is in a loft; the space is small, and I’ve been simply unable to get a good stereo image from my monitors.  The entire room is made up of hard surfaces, so I decided to put up some sound absorbing panels in front of the mix position to see if it would improve my imaging problem.

I wasn’t really excited by the look of foam products, so I opted for Primacoustic Broadway panels which are 2 foot by 4 foot fabric covered 2″ thick fiberglass.  The panels are sold in sets of six; I needed eight panels, but I decided to start with the six-pack and go from there.  I also purchased a pack of their impaler mounts  to simplify mounting the panels to the wall.

When the panels arrived, I unpacked them and discovered that they were permeated with the smell of the adhesive used to attach the fabric.  I share the loft space with my wife; there was no way these panels were going in smelling like they did, so I took the panels out to garage, where I cut a hole in the shipping box they came in, put spacers between the panels to let air circulate, and aimed a fan into the hole to speed things up.   It took a couple of weeks for the smell to subside to the point where the panels could be brought indoors and pass the sniff test.

The loft ceiling follows the roof line, and so I was able to use impalers for both the vertical wall and ceiling installation.  I marked out the space and hung two panels on left and right vertical walls forward of the mixing position.  I used a mirror to locate the reflection point, and positioned the panels accordingly.  I used the same trick to locate the reflection point on the ceiling.    A key challenge in hanging the panels on the ceiling was figuring out how to align the panels so they would line up.  Simply marking lines on the wall wasnt going to work for a single installer, because when you hold the panel up, you cannot see around the long end of the panel to see the alignment marks.  I solved this problem by putting up a strip of wood at the alignment mark; then it was a simple matter to place the end of the panel against the wood strip, and then slide the panel into the impalers.  I marked out the ceiling and had the panels up relatively quickly.

You can see in the photo above where the strip of wood has been placed across the ceiling at the point where the panels are to align (you can also see where one panel has been installed, and the impalers have been attached for the next panel).  I cut the strip about a quarter-inch short, and cut some spare pipe insulation to make cuffs at each end; this let me slide the strip into place, with the pressure from the foam keeping it in place.

To  keep the weight down, I used 1×3 strips, which resulted in the strip bowing in the middle; to prevent this, I installed a temporary L bracket, screwing it into a ceiling joist at the midpoint to keep the strip straight.  You can see the strip held in alignment by the L bracket and with a foam cuff at the end the photo above.

In the photo above you can see the final result.  The panels are perfectly aligned and deliver a professional visual effect.

In a future blog I’ll let you know what effect this has had on my stereo imaging problem.

The Watcher

September 19, 2010

I want to set up a system for watching birds, seeing when visitors come to the door, and keeping an eye on the kids.

To that end, I picked up a Panasonic network camera (bl-c210a) and a Lenovo q150 net top.

So far, I’ve just unpacked the q150. The documentation is sparse, but the device is fairly simple. The version I got has the nvidia ion graphics, so in theory this will stream and decode some excellent video, but thats not my primary application (yet), so comments on that area will have to wait.

The q150 came with a spiffy little micro keyboard/trackball, and absolutely no documentation. I had to read the description on the web about 20 times to finally figure out the the USB micro dongle is stored in the battery compartment! Plug in and a reboot and away it went.

Next step is to hook up the camera. The bl-c210a I bought came with a PoE (power over Ethernet) adapter, so I’ll only have to run an Ethernet cable to wherever I put it. I debated running power and going 802.11 wireless, but this felt like a better compromise. At some point I might set up some 802.11 cameras at the bird feeders and see if I can run them from solar, but that’s for the future.

I’ll follow up when I have the camera running.

Hello world!

December 18, 2009

Welcome to WordPress.com. This is your first post. Edit or delete it and start blogging!